This page provides a detailed guide for installing the SnapPlate on the Polestar 3. Follow the step-by-step instructions to ensure a secure fit and optimal placement for your front plate.
Instruction Guide - Polestar 3 2025 SnapPlate
Installation
-
![SnapPlate T10/T25 Screwdriver]()
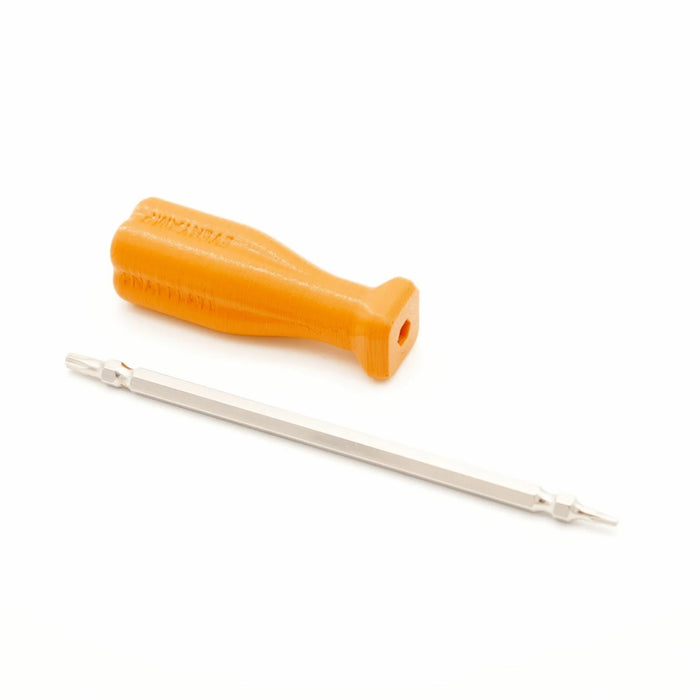
Step 1
Remove the T10/T25 bit from the screwdriver handle and reinstall with the larger T25 bit facing out.
-
![Two black metal wall mounting brackets with rectangular frames and mounting holes, displayed side by side on a white background.]()
Step 2 (Optional)
This SnapPlate ships with the plate mount in the high position which mimics the factory license plate position.
To change the position, go to the Plate Height Adjustment instructions before continuing with installation. ☝️ -
![A screwdriver tightening a screw on a license plate, partially showing the word LATE and red cursive letters above.]()
Step 3
Install your license plate on the plate mount using four of the included black or silver washer-head torx security screws.
Note: Make sure the SNAPPLATE logo on the top of the base and the license plate are both right side up. -
![Close-up of a black plastic device with a textured surface, visible screws, and a small panel labeled OPEN next to a hexagonal socket.]()
Step 4
Push and hold the OPEN button on the right side of the base.
-
![A black license plate holder labeled “SNAPPLATE” with an orange arrow pointing down toward a slot in the center of the holder.]()
Step 5
Align the opening in the base with the top, center vertical bar in the grille.
-
![Black plastic mount labeled SNAPPLATE attached to a license plate frame, with an arrow pointing to a small tab on the left side.]()
Step 6
Push the CLOSE button to secure the SnapPlate to the grille.
Important! There should be some resistance, but the button should not be difficult to push. If it's too difficult, adjust the depth following the grille depth adjustment instructions ☝️.
-
![Close-up of a black plastic device with a sliding switch labeled CLOSE and visible screws on its surface.]()
Step 7
Double check that the CLOSE button is flush with the body to ensure that the SnapPlate is fully attached with the magnets engaged.
-
![A screwdriver is inserted into a screw on a black plastic device, near a labeled panel that reads RESET.]()
Step 8 (Optional)
Optionally, tighten the black anti-theft security screw in the hole on the right side.
Note: It should take ~8 full turns to lock or unlock the screw. It does not need to be fully removed. -
![Close-up of a black plastic device with a textured surface, visible screws, and a small panel labeled OPEN next to a hexagonal socket.]()
Step 9
Don’t forget to remove SnapPlates for automated car washes. Most touchless washes are fine, but better to be on the safe side!


Plate Height Adjustment
-
![SnapPlate T10/T25 Screwdriver]()
Step 1
Remove the T10/T25 bit from the screwdriver handle and reinstall with the larger T25 bit facing out.
-
![A black rectangular metal mounting bracket with four screws and orange washers, viewed from above on a white background.]()
Step 2
Remove the four plate mount screws.
-
![A black metal license plate bracket with four attached bolts, set against a white background.]()
Step 3 (Low)
Position the base with the SNAPPLATE logo facing up, and install the screws with the plate mount oriented below the base.
-
![A black rectangular metal mounting bracket with four screws and orange washers, viewed from above on a white background.]()
Step 4 (High)
Position the base with the SNAPPLATE logo facing up, and install the screws with the plate mount oriented above the base.


Grille Depth Adjustment
-
![Orange screwdriver handle and a double-ended metal screwdriver bit placed on a white background.]()
Step 1
Remove the T10/T25 bit from the screwdriver handle and reinstall with the smaller T10 bit facing out.
-
![A hand uses a screwdriver to assemble a black plastic device labeled SNAPPLATE and POLESTAR 3.]()
Step 2
Locate the T10 torx screw in the center of the sliding latch.
- Go to Step 3 to loosen the fit
- Go to Step 4 to tighten the fit
-
![A hand uses a screwdriver to tighten a screw into a black plastic object labeled SNAPPLATE and POLESTAR 3. An orange arrow indicates the screw direction.]()
Step 3
Turn the screw counterclockwise (lefty loosey) 1/2 turn to loosen the latches by 0.25mm. Pull the latch with your fingers to make sure it is extended and then try the fit on the grille.
Repeat up to four times (two full turns) as needed.
Important! Contact support before proceeding past two turns. Something unusual is going on. -
![A hand uses a screwdriver to turn a screw in a black plastic device labeled POLESTAR 3 and SNAPPLATE, with an orange arrow indicating screw rotation.]()
Step 4
Turn the screw clockwise (righty tighty) 1/2 turn to tighten the latches by 0.25mm and try the fit on the grille.
Repeat as needed.